I was looking for a unique way to frame a photo of myself to use on my website. I ran across this beautiful blue scrapbook border on Pixabay but I needed a way to make the opening transparent. After doing some research I discovered how to do it using Paint.
First I downloaded the scrapbooking frame image on my computer from Pixabay, making sure the file size I chose was bigger than my picture.

Then I opened *MS Paint and made my background fairly big, then I opened my photo and dragged it to the center of my background. *(To open Paint, go to start > all programs > accessories > Paint). I made sure the photo was the size I needed before I went on to the next step.
Then I clicked on paste, and selected “paste from” and opened the frame image from my computer, which put it on top of my photo. Note: It’s important to keep the frame image selected until you are done editing it because once you unselect it, it’s stuck to your photo and the two become one… ask me how I know :(.
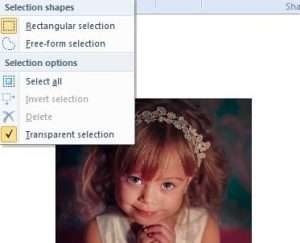
Anyway, while it was still selected, I chose “select” from the menu and then clicked on “transparent selection.” That removed the inside part of the frame and allowed my picture to show through.

Then I moved the frame and decreased the size till I was happy with the way it looked. My photo actually ended up being bigger than the frame so I clicked on “crop” to get rid of the extra size.

Once a photo is framed with this beautiful image, it could be used in a variety of projects, such as in scrapbooking or card making. Wouldn’t it make a great birth announcement? Just put it on the front of a card and finish it by adding some ribbon or other embellishments.
I know there is a lot more information about Paint and using digital frames that could be shared. Please comment and let us know your experiences and any tips you have for using MS Paint in your crafting and art projects.
Go here to watch the video on Youtube
