Images for Art: Taking Your Own Photos
One of the ways to get images to use in your art is to take your own photos. There are many ways to use these photos in your mixed media art. Here are some things to contemplate when shooting.
Photos for art that commemorates or celebrates- scrapbooking or creating art that commemorates or celebrates the accomplishments and lives of people or shares highlights of a special vacation or memories of a beloved family pet etc. is a meaningful way to create art.
Creating this kind of art will be easier if you have the right photos. Whenever it’s appropriate, carry your camera with you and keep your goals in mind. Always be on the lookout for interesting shots.
Here are some ideas of events and occasions where you might want to take photos:
- family reunions and vacations
- birthday parties
- anniversary celebration
- the arrival of a new baby in the family
- when visiting places that have historical significance, such as the birthplace of your great grandfather or the one-room schoolhouse your mom’s aunt attended etc.
When creating art to help remember parties, celebrations and reunions etc., take pictures of the place where the event is held and a few of the highlights. Also take plenty of photos of the attendees involved in a variety of activities and even a group photo, if that’s possible.
Shoot pictures of interesting objects and things that could be used as details in your art. For example, in creating art that celebrates your parent’s 25th wedding anniversary, you may want to take a photo of the coffee table your dad made for your mom or the house they lived in during the first year of their marriage.
Family pets also make a good theme for this type of mixed media art. You will want to take photos of your pet in a variety of settings and poses. You may also want to take pictures of their favorite foods and toys as well as anything else that is an important part of your pet’s world.
You don’t have to have a specific art project in mind when shooting photos, but if you ever decide to create this type of art, you’ll be very happy you had the foresight to take the photos.
Images of People- Do you enjoy using images of people in your art? If I’m at a park or a public festival, I watch for people who stand out to me. It may be a girl carrying a bouquet of sunflowers, a woman with an oversized hat, a man carrying a dog etc. I usually make myself inconspicuous and snap away.
I do not use recognizable images of people in my art unless I get their permission. What I’m looking for is the concept. Later on, I can use the images as inspiration to create my own art. I might also just use parts of the image or edit the photo by using a variety of filters, recoloring, moving things around, adding elements from another image so that it looks totally different.
For example, I took a photo of a lady carrying a bag of sunflowers on her back. It was a striking picture. Since her her back was to me, I didn’t have to be concerned with her face being recognized. I cut away the background, changed the color of her hair and replaced the pants she was wearing with a long dress. Now I have an image that I can use with a variety of backgrounds and I can change it even further, using the filters in my photo editing program.
If you enjoy using images of animals and birds in your art, you will find photo opportunities all around. You can take pictures of your own pets as well as the pets of relatives and neighbors. You may also want to take your camera to the zoo or to the parks you go to or when visiting friends or relatives who live on a farm. You may want to check with the pet owners before snapping away.
I don’t consider myself a professional photographer by any stretch of the imagination (although I do hope to get better over time) so my goal is not necessarily to use my photos as they are. Instead, I’m hoping to able to extract the subject from the background, transform the image with filters and use it in a variety of backgrounds and settings.
Here are some examples.
This is my father in law’s beloved cat, Nikki. She was on the porch lying beside a green cooler when I got down on my knees to snap this photo. In GIMP, I isolated her, did some touch-ups, and used a digital painting filter before I started adding the (digitally recreated) flowers and grass. It’s now for sale as a card at Greeting Card Universe.
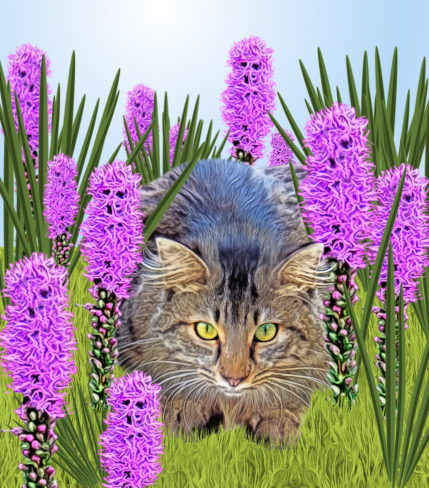
You can see it for sale at
http://www.greetingcarduniverse.com/LorenesCards
I used this photo I took of a green magpie at the zoo to create several pieces of digital art.
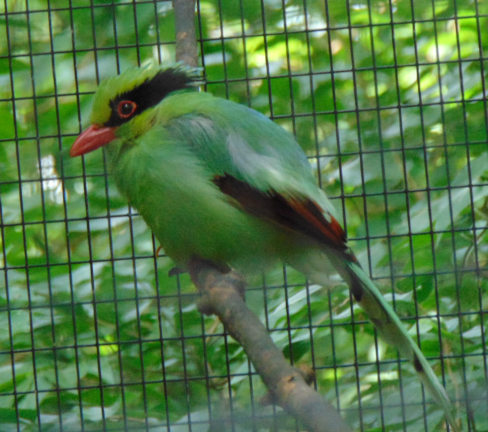
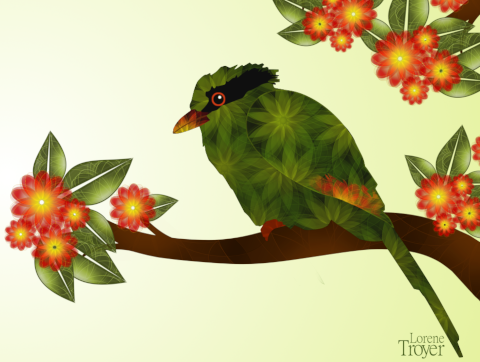
This image is for sale as a card at Greeting Card Universe
This image is for sale at Dreamstime
Details
One of the things your art needs is details. Details can fill in empty spaces, add interest to your piece and support your main subject. As you carry your camera, be looking for items that could be used in your art- butterflies and other insects, flowers and plants, buildings, everyday objects etc. I am mostly interested in the outline and shape of the item because I know I’ll probably isolate it from the background and turn it into digital art.
Backgrounds
You can use backgrounds as backdrops for your images. Whether it’s a stone wall, a mountain, a wooden fence, or a bridge, look for shots that would make a good backdrop for your art.
Textures
A variety of textures are good to have on hand to use in to use as backgrounds, and add interest and contrast to your art. Here are some ideas:
natural fabrics such as burlap, denim or linen
silk fabric
stone or brick walls
tree bark
grass
aged wood
These images can be printed out and used in much the same way you would use patterned paper from a craft store. Use torn bits of paper to to add interest, or to use as a backdrop for words. If you create digital art, you can use them to add texture to your projects. Before you print out your backgrounds, you may want to desaturate the image and perhaps increase the contrast, so you can color or tint it yourself.
As you can see, there are many opportunities to take pictures to use in your art, so take your camera with you whenever you can. Make sure you have spare batteries and lots of space to store images. It’s not a good moment when you are out somewhere with lots of good photo opportunities and your batteries are all used up or you have no space left to put your images.
Here are some tips for your consideration. Since you may only be using the parts of your images, not all these tips will apply to every photo.
When taking pictures outside, try to avoid shooting in direct sunlight. Instead, move into the shade or provide your own shade. If you must take take photos in the sun, you can use a flash to eliminate some of the harsh shadows that can be produced. Some of the best times to shoot outside are mornings, evenings and on overcast days.
Before shooting, think about which orientation would work the best. Don’t be afraid to turn your camera to a vertical position to make it more interesting.
Look for the “not so obvious” shots. The wadded up piece of paper by the wastebasket, the curled up leaf in the corner of the garage, the sparrow sitting in the grass, the freshly poured cup of coffee, the clothes hanging out on the line etc.
If possible, get rid of distracting elements. Before you take the picture, pay attention to what you see through the viewfinder. Notice that empty pop bottle on the ground or the branch cutting through the top of your photo. You may be able to remove the offending elements or simply shoot from a different angle.
Try different/unexpected angles. Get on your knees, lie on your back, or try shooting photos from above. You may also want to place your camera on the ground. You may not be able to look in the viewfinder as you’re shooting, but this is a way to shoot pictures of flowers, grass or other plants against the sky.
Often times, putting your subject off center will give more pleasing results. It has to do with the rule of thirds, where the image is divided into * “into nine equal parts by two equally spaced horizontal lines and two equally spaced vertical lines, and that important compositional elements should be placed along these lines or their intersections.[2] Proponents of the technique claim that aligning a subject with these points creates more tension, energy and interest in the composition than simply centering the subject.” It goes on to say, “…Points of interest in the photo do not have to actually touch one of these lines to take advantage of the rule of thirds.”
The rule of thirds is not a rule you have to follow; it’s simply something to consider when taking or cropping photos to see if it makes your composition more interesting.
Leaving space (called negative space) around your focal point will allow you to crop your images later. You may want to use the rule of thirds or allow more space on one side or the other to emphasize your subject.
Use a tripod. Although taking a tripod with you can be unhandy, it’s a good way to eliminate blurry photos caused by unsteady hands. However, there are other options. Look around and see if there’s a way to steady your camera. For example, can it set on a picnic table or place it on a banister? Is there a building you can lean against to steady yourself?
Many photographers use beanbags, which can be placed on various surfaces such as rocks, branches, the hood of a car etc. to steady the camera as well as to protect it from falling or getting dirty or scratched. You can make your own or simply place a bag of rice or beans into a sock or a small pillowcase.
*(Wikipedia contributors, “Rule of thirds,” Wikipedia, The Free Encyclopedia, https://en.wikipedia.org/w/index.php?title=Rule_of_thirds&oldid=849578151) (accessed July 16, 2018).
